|
Shop Directory
Cards Accepted
|
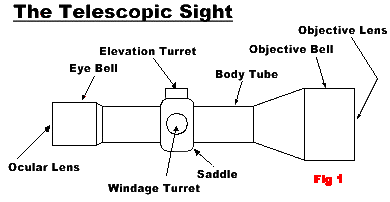
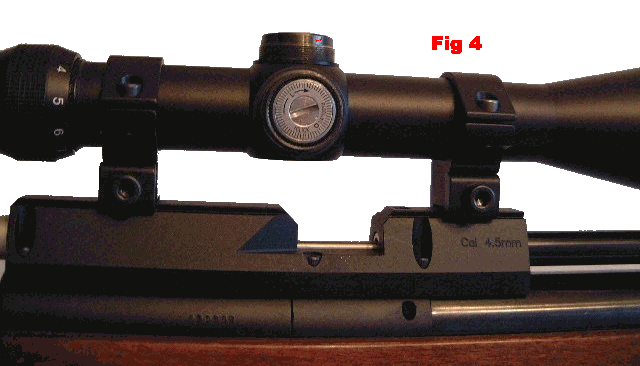
Setting up your Telescopic SightSetting up a Telescopic SightWelcome to this guide to setting up and zeroing your telescopic sight. I will start by describing the main parts of the Telescopic sight before moving on to talk about mounts and mounting the scope and finally zeroing the scope. The Telescopic sightWhen we look at a telescopic sight there are four main parts that we see. Starting at the front of the sight the is the "Objective lens" usually this is larger than the main part of the sight and the larger diameter part is called the "Objective bell". The objective bell tapers down to the "Body tube" of the scope. The body tube can come in different diameters the commonest size is one inch, with 30mm being available on some of the more expensive scopes. The 30mm body tube is becoming more popular now in the UK, both on long range Centerfire Rifles and Air Rifles, as they allow a greater range elevation adjustment allowing you to dial elevation changes for say FT from 7 yards all the way out to 55 yards. Often 1" scopes will run out of adjustment over such a large change in range. There is a third size which is available on some european scopes which is 25mm. At the back of the sight is the "Ocular lens" or eye piece. This is also usually larger than the body tube and the larger part is called the "Eye bell". On a variable magnification scope the zoom ring is usually mounted in front of, or at the front of, the eye bell. The eye bell also has a means to set the focus of the cross hair or "Reticule" of the scope. There is one other control that you may find on a scope and that is a "parallax control". This is also known as the focus control or rangefinder. It is used to focus the image of the target with the Reticule The parallax control is usually found as a ring around the objective bell, it can also be found as a wheel on the side of the saddle opposite the windage turret. The last thing we need to know before we can consider mounting the scope to the rifle is the "Eye relief" this is the distance that the eye has to be from the ocular lens so that you see the image across the whole of the lens. The eye relief is usually set to around two inches so that the scope will not hit you when the rifle recoils. Mounting the sightThere is a choice that has to be made between using 2 piece and 1 piece mounts. The 1 piece mounts used to be popular in the days of the very heavily recoiling spring air rifles with long scope rails. Two piece mounts are now preferred as when used with a recoil pin they do not suffer from creep and they are more flexible in the mounting options they provide especially with modern pre-charged guns which often have the scope rail split by the loading port or magazine. The mounts also come in differing heights to allow for the different diameters of the objective lens, the scope in fig 2 for example has a 50mm diameter lens and needs to be mounted in high mounts. When installing the mounts on the rifle they should be positioned so that they are as far apart as possible, with around a quarter of an inch from the eye and objective bells being about right. On guns with short divided rails, the scope will have to be positioned in the mounts so that the eye relief is correct. When setting the scope in the mounts the Reticule needs to be set so that it is upright when in your preferred shooting position, this can be done by loosely fixing the scope in the rings, getting into the shooting position (fig 3) and very gently moving the scope so that the Reticule is upright compared to a known vertical. With a rifle with a long rail the eye relief can be set by moving the mounts along the rail while in the shooting position, with a two piece rail it may be necessary to move the scope in the rings to achieve the optimum eye relief. When tightening the rings around the scope it is very important not to over tighten the screws as the scope could be irreparably damaged. When the rings are tight there should be a small gap between the two halves of the rings, the screws need to be tightened evenly but only "firmly", when using allen keys to tighten the rings using the shorter arm to apply the pressure to is the best idea, even on a spring air rifle. This is shown in fig 2 where you can see the gaps between the two halves of the rings. If the rings are screwed down so the two halves meet then the body tube will be crushed and dented, This will affect the components that move the Reticule to zero the sight and zoom the image, the result will be a scope that will not hold a zero when the zoom ring is turned and will not return to zero as the windage or elevation is adjusted. Zeroing the Telescopic sightSo now we have the sight mounted on the rifle we need to set the zero. This is not as difficult as some people believe. Before we start the process however, there are some technical considerations we should discuss.
Fire three good shots at the aiming mark, this will form the group from which you can calculate the correction required to set the zero of the rifle. From the position of the center of the group of shots you must measure horizontally and vertically to the center of the aiming mark. Once you have the size of the error you can calculate the number of clicks of adjustment that you need to use. For example if your group is one and a half inches high and two inches right at 25 yards, and you have 1/4 minute adjustment, then you need to adjust the sight 24 clicks down and 32 clicks left. The direction to turn the adjusters should be marked on them or the turret, if they are not then usually turning the adjusters clockwise will move the shots down on the elevation and to the left on the windage turrets. Once you have made the adjustment you must fire another group of three shots, if the group appears to be correct or reasonably close then increase the number of shots in the group to five. The more shots you have in the group the more certain you can be of where the center of the group is, however, you must remember to discount any shot that you felt was not as good as it could be, even if it is in the center of the group. This process of firing a group and making the adjustment should then be repeated until the center of the group is in the center of the aiming mark. Some times it will be found that the adjusters on the scope will run out of movement before the shots are centered on the target. With an air rifle it is usual to find that the gun is shooting low, this is easily corrected by "shimming the mounts". To shim the mount first set both the windage and elevation adjusters to their mid positions, The scope must then be removed from the rings and if the rifle is shooting low a shim is added to the lower half of the rear scope ring. Shims are usually made by cutting a piece of film negative to to fit the ring. The scope is then refitted to the rifle and a group fired, it may be necessary to add several shims until the group is close to center and the final zero can be made using the adjusters on the scope. By having one of the adjusters very close to the end of it's travel the amount of adjustment available to the other adjuster can be severely restricted. Getting someone else to set up the scope for you is not going to work, as the way they hold the rifle is going to be completely different to the way that you do. This means that the setup for a scope will be personal to only one person. You! |
 These are usually much older scopes built for european made center-fire rifles. The body tube can be made in one or two pieces, the one piece tube being preferred for its greater strength. Mounted on the body tube is the "Saddle" on the saddle are the adjustment knobs or "Turrets" which adjust the aim up or down "Elevation", and left and right "Windage".
 Fig 2 shows a Tasco Target scope with parallax adjustment on the objective bell and the zoom ring at the front of the ocular bell, this particular scope can zoom from 10× up to 40×, and is fitted with target knobs on the windage and elevation turrets to make adjustment easier.
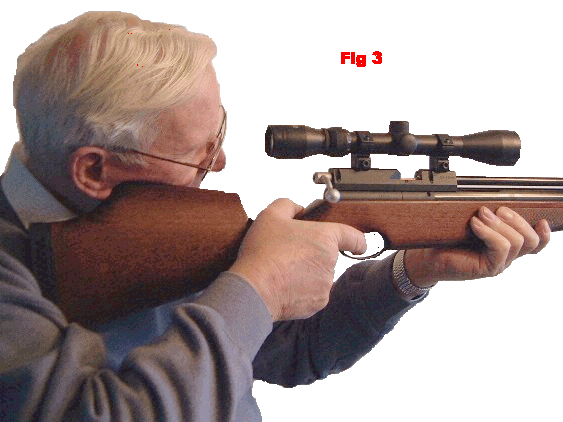
 The adjusters on the windage and elevation turrets have click stops on them so that they may be moved in known steps, on most scopes these steps move the sight by 1/4 of a minuet per click. Fig 5 shows the Tasco target scope which as a finer adjustment of 1/8 of a minute per click. As you may know from your school math's there are 360 degrees in a circle and the degree is also subdivided into 60 minutes. If you draw an angle of 1 minute the distance between the arms at 100 yards will be 1.0475 inches. So at a range of 100 yards with 1/4 minute stops on the adjusters then one click will move the shots by 1/4 of an inch. Now we can calculate the number of clicks needed to move shots onto the target. For an air rifle a zero range of 25 yards is probably ideal, at this range one minute of arc is 1/4 inch, so for a 1/4 minute adjustment at 25 yards you need 16 clicks to move the shots one inch.
 Now we are ready to start shooting. With a new rifle it is usually a good idea to fire ten or twenty shots into the backstop first so that the rifle has a chance to run in a bit. For a target we need a large sheet of plain paper with a one inch square drawn on it in the center, this will be our aiming mark, and should be set in front of a safe back stop at our chosen range. When zeroing it is important to use the most stable position possible, this means that you should use a rest. When using a rest you should hold the rifle and rest your left forearm and hand (assuming that you are right handed) on the rest not the rifle, this is especially true for a rifle which recoils. When zeroing all the shots should be fired very carefully and any shot that you are not happy with should be ignored.